HOW TO: Megane Ph 1 to Ph 2 Rear Lights Conversion...
Posted: Thu Apr 22, 2010 5:57 pm
Hi Guy's
As by some demand a few people has asked me to put up photos of how i done my tail light conversion...here is a few snaps with details...
Hope this helps!
Phase 1 Lights

Phase 2 Lights
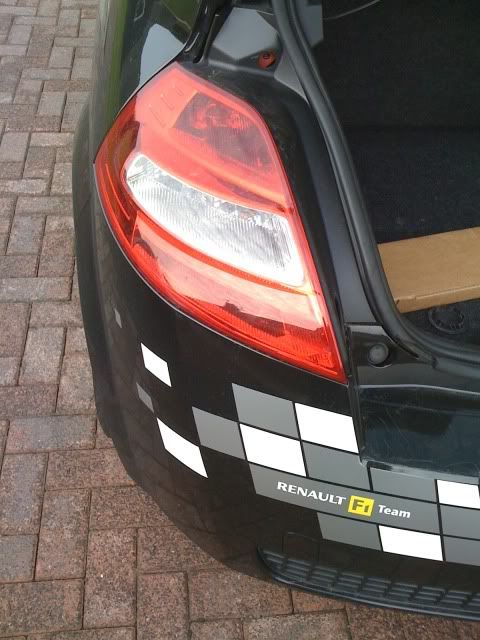
The Guide...
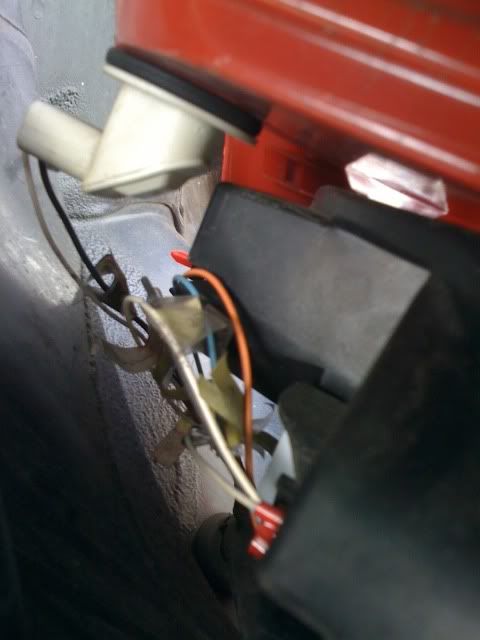
1. Firstly unscrew the tail lights from both sides and disconnect the plugs...
2. Cut the wires off plug off (Leave as much wire length as you possibly can! on all!)
3. Get these connectors...obtainable from maplin shops (you need 13) 6 for the passenger side/7 for the driver side(UK) vice versa for Left hand drive..

4. Strip the wire back about 1cm each...and crimp the connector on the wire (with wire crimps, scissor like things)
5. Put electrical tape around the connectors apart from the bit your plugging in (obviously) to avoid shorts when plugging wires in side by side... you will see like i have done in the photos.
5. PASSENGER SIDE (UK CARS)

From the images (ALL BLACK WIRES ARE GROUND)
Top Bulb = Fog (Does not work on this side UK CARS)
Pin 1 = Ground
Pin 2 = Nothing (Either pin dosent matter, dead anyway)
Lower Cluster (Refering to Picture)
Pin 1 (Top) = White (Reversing Light)
Pin 2 = White (Indicator)
Pin 3 = Black (Ground)
Pin 4 = Orange (Brake Light)
Pin 5 (Bottom) = Brown and Blue (Side Light's)
There is 2 white non-colour coded wires...dont be afraid to test as its trial and error...you may have to swap around...example...reversing light may be indicator bulb..you get the drift just swap pin 2 to 3, 3 to 2.....
DRIVER SIDE
There is now 3 white wires to deal with...again this is trail and error....you cant blow anything so dont be scared!! it's actually quite fun!
Top Bulb = Fog (works on this side UK CARS)
Pin 1 = White
Pin 2 = Black (Ground)
Lower Cluster (Refering to Picture) (Same as passenger side)
Pin 1 (Top) = White (Reversing Light)
Pin 2 = White (Indicator)
Pin 3 = Black (Ground)
Pin 4 = Orange (Brake Light)
Pin 5 (Bottom) = Brown and Blue (Side Light's)
Happy Modding folks!!!! Enjoy!
Hope this helps you all! Really nice modification!! 30 min job
As by some demand a few people has asked me to put up photos of how i done my tail light conversion...here is a few snaps with details...
Hope this helps!
Phase 1 Lights
Phase 2 Lights
The Guide...
1. Firstly unscrew the tail lights from both sides and disconnect the plugs...
2. Cut the wires off plug off (Leave as much wire length as you possibly can! on all!)
3. Get these connectors...obtainable from maplin shops (you need 13) 6 for the passenger side/7 for the driver side(UK) vice versa for Left hand drive..
4. Strip the wire back about 1cm each...and crimp the connector on the wire (with wire crimps, scissor like things)
5. Put electrical tape around the connectors apart from the bit your plugging in (obviously) to avoid shorts when plugging wires in side by side... you will see like i have done in the photos.
5. PASSENGER SIDE (UK CARS)
From the images (ALL BLACK WIRES ARE GROUND)
Top Bulb = Fog (Does not work on this side UK CARS)
Pin 1 = Ground
Pin 2 = Nothing (Either pin dosent matter, dead anyway)
Lower Cluster (Refering to Picture)
Pin 1 (Top) = White (Reversing Light)
Pin 2 = White (Indicator)
Pin 3 = Black (Ground)
Pin 4 = Orange (Brake Light)
Pin 5 (Bottom) = Brown and Blue (Side Light's)
There is 2 white non-colour coded wires...dont be afraid to test as its trial and error...you may have to swap around...example...reversing light may be indicator bulb..you get the drift just swap pin 2 to 3, 3 to 2.....
DRIVER SIDE
There is now 3 white wires to deal with...again this is trail and error....you cant blow anything so dont be scared!! it's actually quite fun!
Top Bulb = Fog (works on this side UK CARS)
Pin 1 = White
Pin 2 = Black (Ground)
Lower Cluster (Refering to Picture) (Same as passenger side)
Pin 1 (Top) = White (Reversing Light)
Pin 2 = White (Indicator)
Pin 3 = Black (Ground)
Pin 4 = Orange (Brake Light)
Pin 5 (Bottom) = Brown and Blue (Side Light's)
Happy Modding folks!!!! Enjoy!
Hope this helps you all! Really nice modification!! 30 min job
 got one rear light off ebay so ill be getting the other soon!
 This should be made into a 'sticky'.